Luxe Bidet Neo 120 is one of the most popular and affordable bidet attachments in the market. Even though it has a low price tag, you can rest assured of its quality. Meanwhile, it is quite easy to install.
 3")
This post will show you how to install a Luxe Bidet Neo 120 bidet attachment step by step. In fact, the method to install any bidet attachment is more or less the same. Once you understand how to install this attachment, you can deal with other models effortlessly.
The whole process will only take about 15 minutes and nothing too complicated to involve. Don’t hire a plumber, and I am sure you can get it done on your own.
Step 1: Gathering the tools
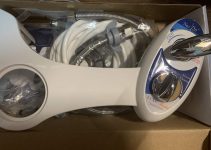
Luxe has prepared almost everything you need to install this NEO 120 model in its package as a reputable bidet brand. You can find the main unit, a water hose, a T-adaptor, some gaskets, a roll of Teflon tape, and even a small plastic wrench in it.
The only thing you need to prepare is a bucket or some soft cloth to catch the water remaining in the tank or hose.
If you find the end of the water supply line is too hard to remove, you may need to prepare an adjustable wrench.
If you haven’t got a Luxe Bidet Neo 120 yet, you can check our review here.
Step 2: Turn off the shutoff valve
The shutoff valve near the toilet regulates if and how much water can be sent to the toilet tank. If you don’t turn it off while installing a bidet, the water coming out will flood your bathroom.
To turn off the shutoff valve, you should turn the valve counter-clockwise.
Step 3: Empty the toilet tank
As we need to remove the water supply line later, we need to empty the toilet tank.
You can get it done by flushing the toilet and holding the handle down until all the water runs out. Opening the tank top is a good way to ensure how much water is left in the tank.
You should also check if the water keeps coming into the tank. If it is the case, the shutoff valve is not fully closed.
Step 4: Remove the water supply line
There will be some water remaining in the water supply line. Therefore, you need to prepare a bucket or soft cloth to catch water.
Sometimes, you can remove the water supply line from the water tank inlet by hand. But sometimes, you will need the help of a wrench.
Once you get the end of the water supply line unattached, place it into the bucket or on the soft cloths, preventing water spread over the place.
Step 5: Attach the T-adaptor to the tank inlet
T-adaptor is for diverting water to bidet and toilet together. Except for the main unit of Luxe Neo 120, this is the most crucial part.
The T-adaptor has been included in the kit, and this metal component is made with solid material that will last for years.
Remember to put the gasket at the top of the T-valve and then screw the T-valve tightly. I installed it with my hands, but you can also do it with a wrench.
Step 6: Remove the existing toilet seat
Installing this Luxe Bidet Neo 120 is different from installing a bidet seat. You need to insert a bracket between the toilet seat and the bowl instead of replacing the seat completely.
Therefore you need to remove your original toilet seat so that the bracket can be placed in the right place.
Removing the seat is simple. Loosing the nuts under the bottom of the bowl and lifting the seat up. Store the nuts and bolts in a secure place because you will need to use them again.
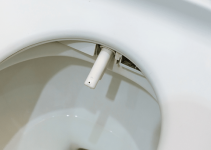
Step 7: Place the Luxe Bidet Neo 120 on the toilet and put the toilet seat back
 1")
If your toilet hasn’t been cleaned for a long time, I advise you to wipe off the dust and stains before placing the bidet attachment on it.
The distance between bowl holes varies according to brands and models. To solve this problem, this attachment comes with two movable circles in the bracket that can turn clockwise and counter-clockwise to accommodate different hole distances.
Once you find the proper placement, you can put the toilet seat back by placing the bolts into the holes through the circles and tightening them with nuts.
Step 8: Connect Luxe Bidet Neo 120 to T-valve
 2")
Now the bidet attachment has been successfully fixed on the toilet. The next step is getting the water source for it to start to work.
To achieve it, you should use the bidet hose to connect the Neo 120 with the T-valve. There is a wing-nut tool to help you fasten the nuts on each end of the hose.
One end of the hose will be connected to the thread on the bottom of the T-valve, the other end will be connected to the bidet inlet located in the side panel.
Step 9: Turn on the shutoff valve and check for leaks
Connect the water supply line to another thread of the T-adaptor and then turn the shutoff valve clockwise. The water will start to flow in, and this is a good time to check if there are any leaks.
If you find any leaking issue, unscrew the valve and tighten it again. If the leaks happen in the hose, you may need to contact Luxe to ask for a replacement.
Step 10: Test Luxe Bidet Neo 120
Finally, we get to the last step of the Luxe Bidet Neo 120 installation – test it.
As this Luxe bidet makes use of the household plumbing system, its water pressure is pretty high. So I suggest you test it with the lowest pressure setting.
You should use a bucket to catch the water from the nozzle. Otherwise, it will spread on the wall and floor.
Don’t forget to test the self-cleaning feature, which is important for your personal hygiene.
Notes for installing the Luxe Bidet Neo 120 attachment on the one-piece toilet
Technically, you can install this bidet attachment on almost any toilet. However, you should make modifications while installing this Luxe Bidet Neo 120 on a one-piece toilet.
As the fill valve is often located on the back of the toilet, it would be tough for you to access it. Alternatively, you can install the T-adaptor on the shutoff valve. In this way, you can remain the fill-valve untouched, and the water can still send to the bidet.
The bidet hose and water supply line may be too short to deal with this issue. You will need to buy some extension hose or a hose with a longer length.
Another issue is that you can’t install nuts at the bottom of the toilet bowl. Instead, you have to buy some top-mounting bolts to get them fixed on the toilet.
Conclusion
I write this Luxe Bidet Neo 120 installation tutorial based on my own experience. I think everyone can get it done by following the 10 steps in this article.
The order of some steps is interchangeable, but you should always turn off the shutoff valve before doing anything else.
The material of this bidet attachment is solid and easy to attach. Just take 15 minutes, and you can start to enjoy your bidet journey.